Creating Your First Document Request
Step-by-step guide to requesting documents from clients
Creating Your First Document Request
Learn how to create secure document requests that clients can easily respond to while maintaining the highest security standards.
Before You Begin
Ensure you have:
- ✅ Completed your account setup
- ✅ Professional profile configured
- ✅ Client's email address ready
Step 1: Opening the Request Modal
From your dashboard, locate the primary action button:
- Click "Request Documents" or "+ New Request"
- The request creation modal will open
Quick Access Options
You can also create requests from:
- Navigation menu > "New Request"
- Keyboard shortcut: Ctrl + N (when on dashboard)
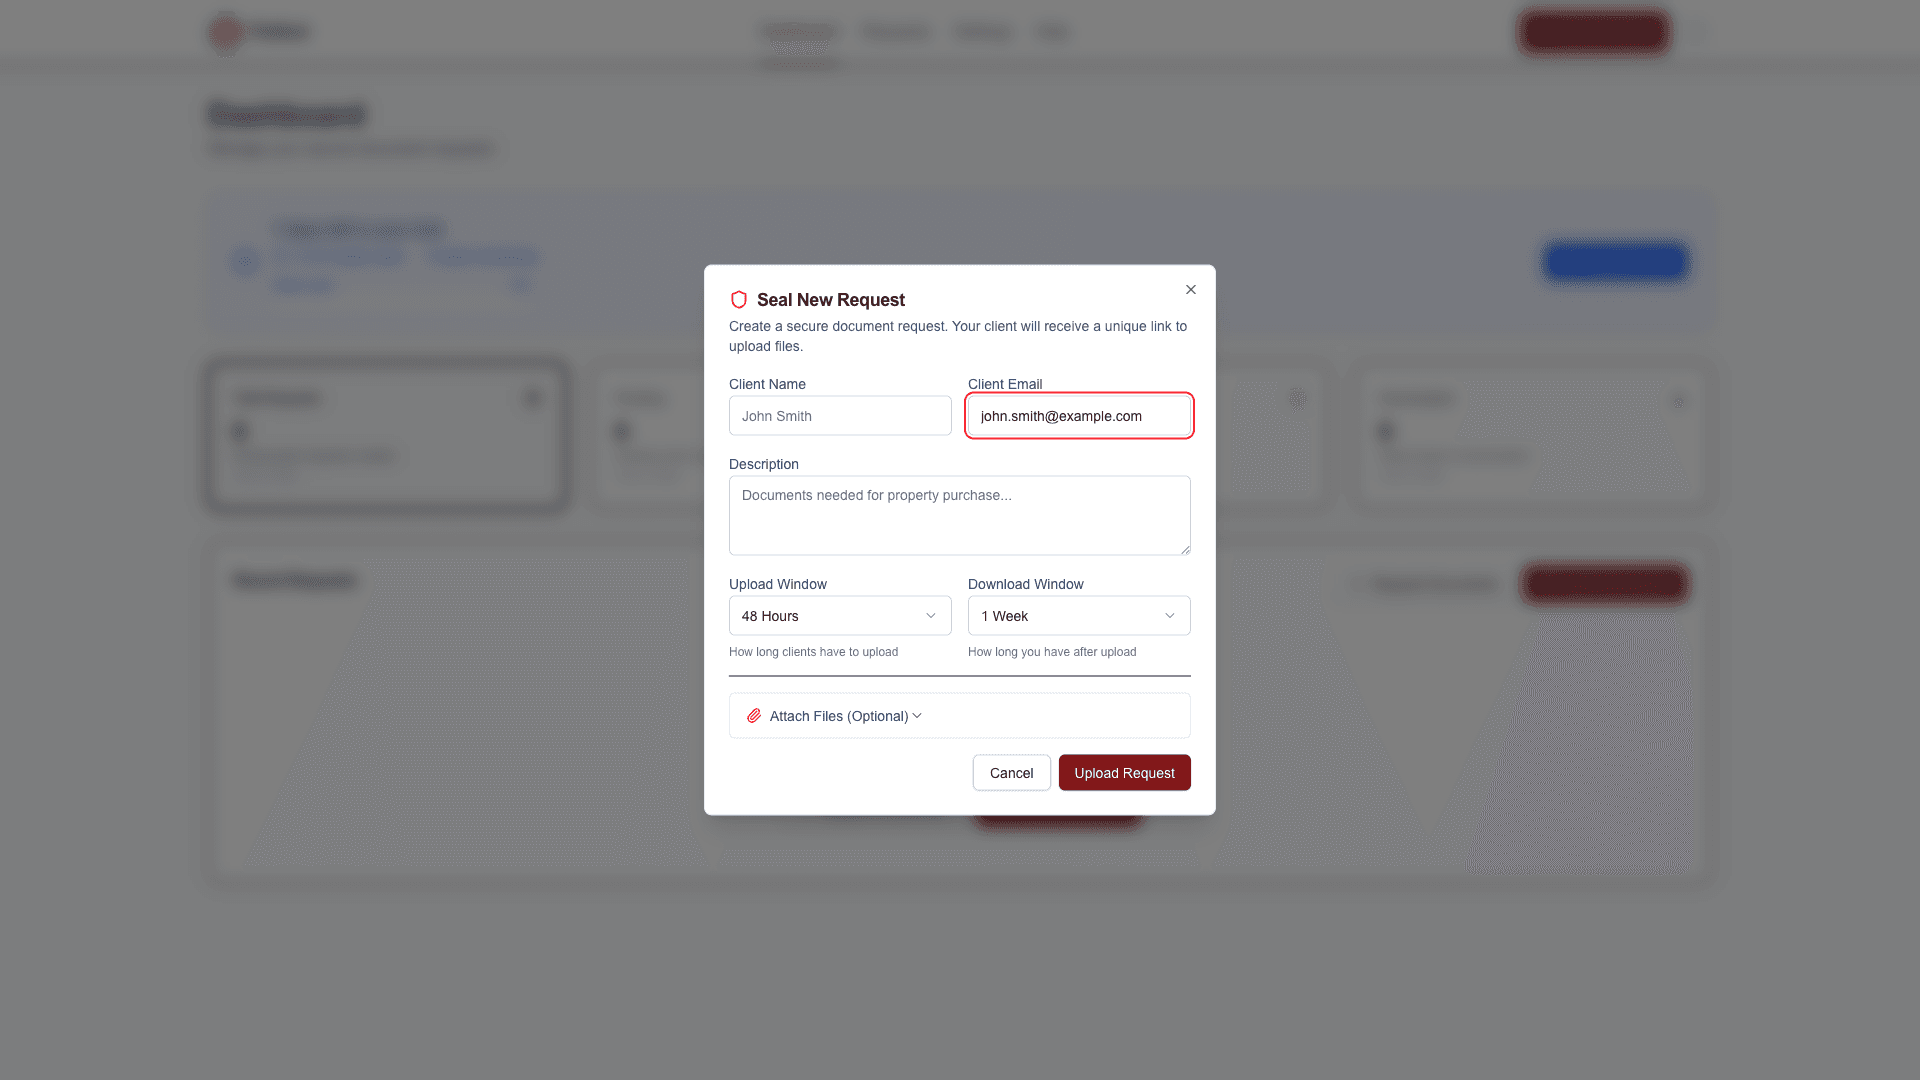
Step 2: Setting Up Client Details
Client Information Required
- Full Name: Client's complete name as it should appear
- Email Address: Where the secure link will be sent
- Description (Optional): Internal note about this request
Best Practices for Client Details
- Use formal names: "Mr. John Smith" rather than "John"
- Verify email: Double-check spelling to avoid delivery issues
- Clear descriptions: Help you identify the request later
Step 3: Configuring Request Settings
Upload Window
Choose how long clients have to upload documents:
- 24 hours: Urgent requests
- 48 hours: Quicker turnaround
- 72 hours: Standard timeframe (default)
- 168 hours (1 week): Complex document gathering
Download Window
Set how long documents remain available after upload:
- 24 hours: Highly sensitive documents
- 72 hours: Standard business documents
- 168 hours: Maximum accessibility
Security Settings
- File types: PDF, JPG, PNG automatically accepted
- Size limits: 10MB per file maximum
- Encryption: AES-256 automatically applied
- File validation: Type, size, and signature checks
Step 4: Personalizing the Message
Default Message Template
FileSeal provides a professional template, but you can customise:
"Hello [Client Name],
I need you to securely upload some documents. Please use the secure link below to upload your files safely.
This link is unique to you and will expire after [timeframe] for security."
Customization Tips
- Add specific document requirements
- Include your contact information
- Explain why you need these documents
- Set clear expectations about timeframes
Step 5: Sharing the Secure Link
Automatic Email Delivery
When you create the request:
- Client receives professional email immediately
- Email includes secure upload link
- Clear instructions provided automatically
- Your professional branding included
Manual Sharing Options
You can also:
- Copy the secure link to share via other channels
- Share the link through your practice management system
- Include in existing email conversations
Step 6: Monitoring Request Status
Dashboard Tracking
Your request appears immediately on the dashboard with status:
- 🟡 Pending: Link sent, awaiting upload
- 🔵 Sealed: Documents uploaded, ready for download
- 🔴 Expired: Time limit exceeded
Email Notifications
You'll receive alerts when:
- Client uploads documents
- Request is about to expire
- Technical issues occur
What Your Client Sees
Understanding the client experience helps you support them:
Professional Email
- Clear subject line with your name/firm
- FileSeal security explanation
- Simple upload instructions
- Prominent "Upload Documents" button
Upload Interface
- Clean, professional design
- Drag-and-drop file upload
- Real-time progress indicators
- Security confirmation messages
Troubleshooting Common Issues
Client Can't Find Email
- Check their spam/junk folders
- Resend from your dashboard
- Share link manually if needed
Upload Errors
- Verify file types (PDF, JPG, PNG only)
- Check file sizes (under 10MB each)
- Try different browser if issues persist
Security Concerns
- Explain FileSeal's encryption to clients
- Share security documentation if requested
- Emphasize one-time access protection
Advanced Request Features
Bulk Requests
For multiple clients:
- Create template messages
- Use consistent settings
- Track all requests from dashboard
Request Modifications
After creation, you can:
- Extend expiry times
- Cancel active requests
- Resend notification emails
Next Steps: Learn about the complete document workflow or explore security features.